MySQL and an Admin Tool (e.g., phpMyAdmin) needs to be installed on a server. See also the tips for installation (German)
Please contact your IT service to clarify how to operate the database safely.
The provided MySQL/Maria database needs to be imported into the installed MySQL and the provided *.zip archive needs to be copied and unzipped in the respective host folder.
Navigation - General functions
As a user, you can also use the navigation buttons from your browser. There might be the request to 'resubmit the form', which you need to accept.
As an admin, that would not be recommended as resubmitting a form might lead to an error.
Cancel / Back
On top of each page a navigation button to previous page can be found:
Back
It cancels all changes done on that respective page.
Edit a row
In some of the views, the content is editable. You can find a blue underlined text in the column 'Edit':
Edit
After clicking on the link, a new view will open, where the details can be changed.
After changing, the button
needs to be pressed to save the changes in the database.
Upload / Download Files
In some of the views, files can be uploaded. You can find a blue underlined text in the column 'Upload / Download':
Upload
An uploaded file will get a revision number as extension of the filename.
If a file is already uploaded with the same name, it will get new revision number as extension of the filename.
In some of the views, files can be downloaded. You can find a blue underlined text in the column 'Upload / Download':
Download
A menu will pop up, where the file to download can be selected. The file will be downloaded to the download folder on your computer, which is same as the standard folder used by your browser.
Insert a row
In some of the views (e.g. when a list of projects is displayed), a row can be added to a table (e.g. to add a new project). You can find a button most probably at the bottom of a table, which needs to be pressed to insert a row in the database.
Main Navigation Menu at the bottom of each webpage
At the bottom of each page a navigation menu be found:
Startpage will you guide every time back to the main page.
Logout will delete the temporary Session File. It is not required to log out, as the temporary Session File will be also automatically deleted, when closing the webbrowser.
Contact is an optional page
Impressum is a legal requirement in Germany, when the webside is used in the www. It is not required when you use it in your internal network or via VPN.
Login
The database is accessed via WebBrowser, the interface is displayed below:
At the bottom of each page a navigation menu be found:
Startpage will you guide every time back to the main page.
Logout will delete the temporary Session File, which will be also automatically deleted, when closing the webbrowser.
Contact is an optional page
Impressum is a legal requirement in Germany, when the webside is used in the www. It is not required when you use it in your internal network or via VPN.
User profiles
There are three different kind of user profiles defined:
Admin
User
Manager
Different views will be displayed according the assigned profile.
Profile 'Admin'
The admin can
create, update or delete a user.
After login, the main menu is shown with the options for the respective profile.
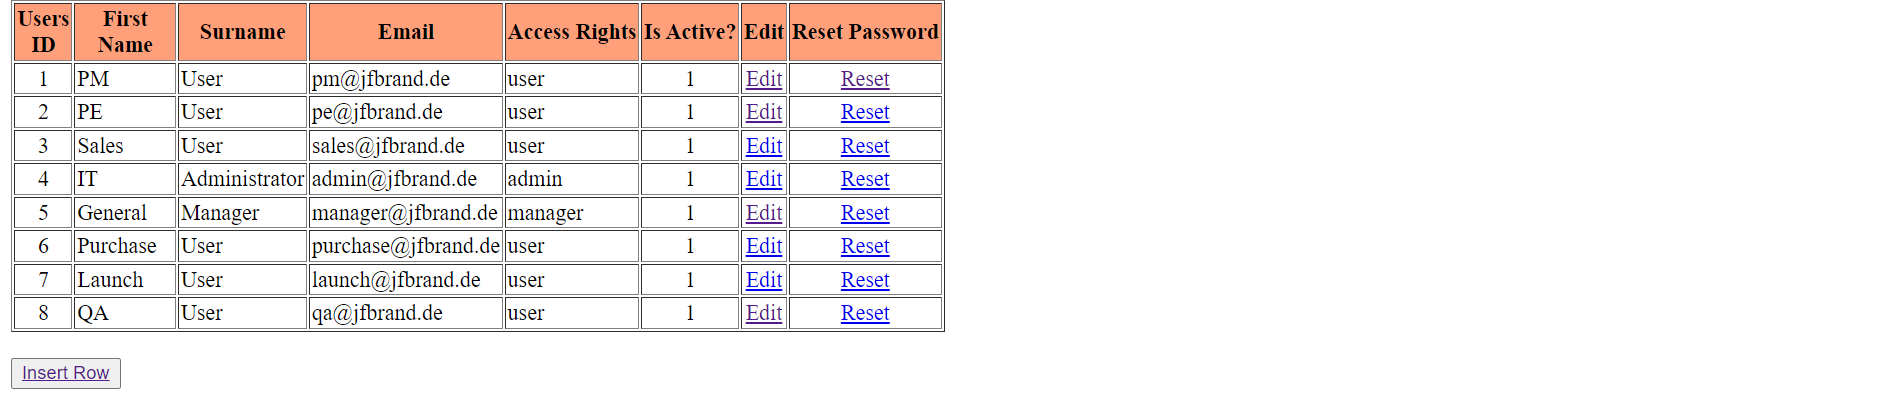
Main menu option 'Create, update or disable user'
After pressing the button 'View', a table is shown with all user.
To reset the Password, press 'Reset'. The password is than reset to the standard password.
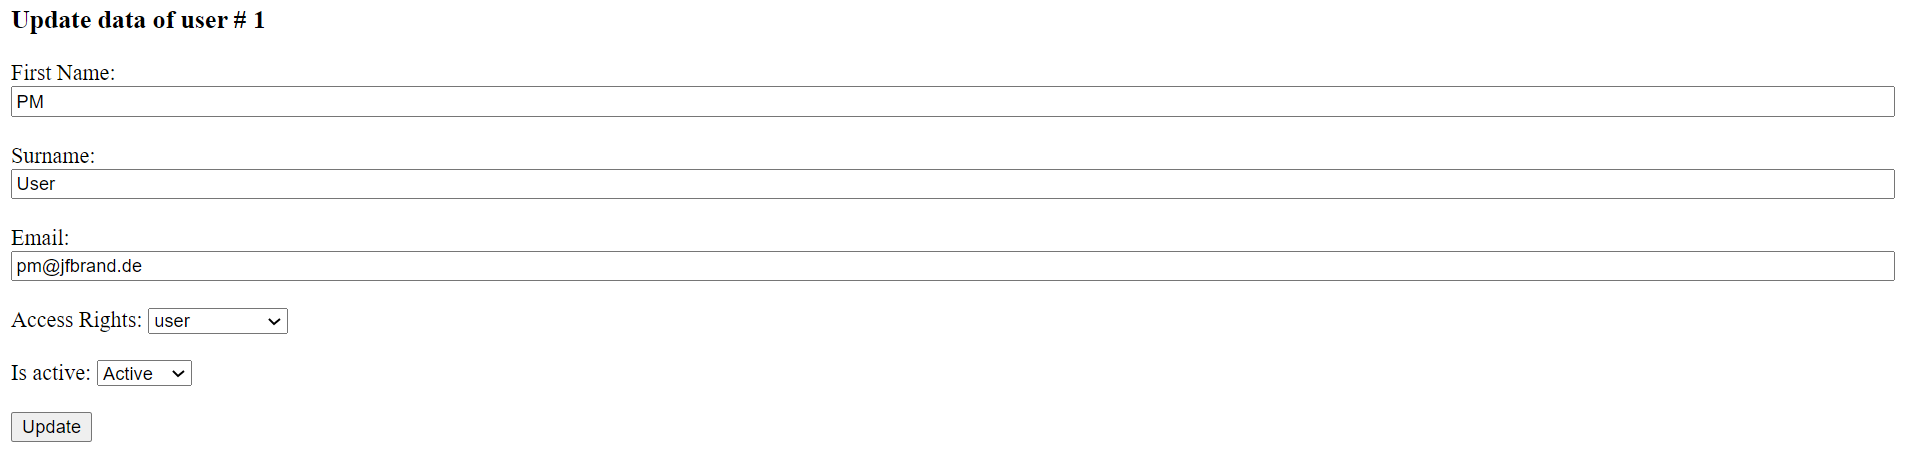
After pressing the button 'Edit', the respective user can be updated.
Main menu option 'update / overwrite data'
Main menu option 'update read ('R') or write ('W') rights to specific columns'
Main menu option 'create, update or disable an approver'
Please note: Till tooling release the approver is defined as the team member. Only after Tooling release an approver needs to be defined.
After pressing 'Create', 'Close', 'View' or 'Update' the respective menu come up.
The following steps are pretty self explanatory. In case of any questions, please contact our support hotline.
Profile 'User'
The user can
update the projects(s), where he is the assigned member,
approve EC's as team member before tooling release, where he is assigned member and responsible for a function and
review EC's as Champion, where he is the assigned champion.
The respective menus are shown below:
At the menu "Update EC as Member": When selecting a project ID and pressing "open", the respective project will open:
In the column'Send for Approval', which only appears for the Project Manager, the button will start tbe approval process with sending emails to the respective approvers.
All financial information will be frozen for this EC.
To update a row, press "Edit" and the updates can be done in below form:
In the table 'project_data_accessrights' of the database 'ecmanagement', it is defined,
which team member role can see 'R' or edit 'W' the respective items.
The admin can update the table according a company's need.
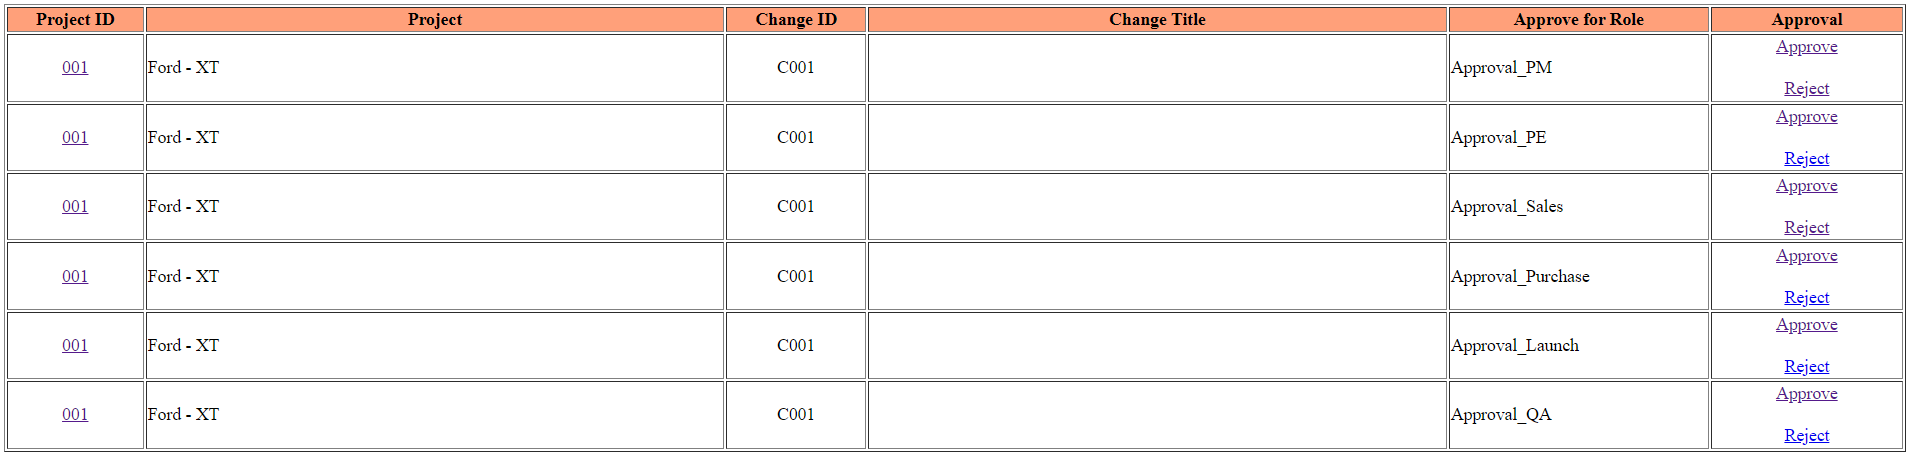
At the menu "Approve EC's": When pressing "view", the pending approvals will be shown:
When pressing approve, the respective line will disappear, when pressing 'reject', following menu will pop up:
The project leader will get an email with the reason for rejection. Please note: A rejection is a final rejection,
only the administrator can undo it with effort. It should not be used as communication tool!
Once one approver rejects an EC, the EC will not be shown for approvals to other approvers.
A new EC has to be created, if the change is still required.
The champion is the person, who show provide can support and guidance to the actions, when the team cannot solve it themself.
It can be the manager of the project leader, but it can be in theory any 'User' who is able and willing to support.
At the menu "Review EC's as Champion": When selecting, the user can see an overview of red items, where he is responsible as champion.
When following the link in column 'Change_ID', the detailed EC's for the respective project will be shown.
The champion can only see but he cannot edit or change the details.
Profile 'Manager'
The manager can
see an overview of all projects vs. the Role
get details
approve EC's (after tooling release)
The respective menus are shown below:
At the menu "Review Projects vs. Role": When selecting a Role and pressing "View", the respective overview will open:
The details are displayed when clicking on the link in column 'Project Number'.
In the table 'project_data_accessrights' of the database 'ecmanagement', it is defined,
which columns are visible. The admin can update the table according a company's need.
At the menu "Approve EC's": When pressing "view", the pending approvals will be shown: